With that said, I want to remind you that I am hosting a GIVEAWAY starting Monday, March 1! The givaway is to celebrate all the fun new features I'll be revealing for this blog. Want a sneak peak? There will be a new and improved way to navigate through all the recipes and crafts, the "Best of Blessed, and my official twitter debut!
The giveaway will be super easy to enter - I'll explain how on Monday. But if you want to get a head start, become a follower! That right there is worth one entry. Easy Peasy! And if you follow, I know that you'll be blessed by all the great times we have here. So scroll on down and click the "follow" button!
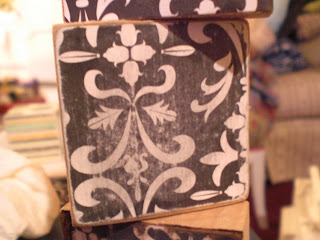
Also, after seeing such enthusiam over the Brownie Blocks {thanks gals, you make me blush!} I am pleased to announce that I will including a set of them in the GIVEAWAY! Tonight I'll be busily putting on the finishing touches on the blocks and the other goodies included in the prize. {{giddy with glee}}
OK, on to the tutorial!
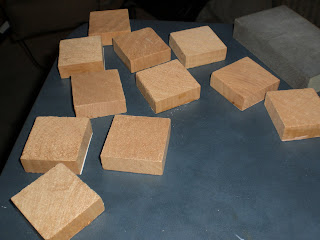
See the little blue/green blocks in the right corner? Another project almost completed!
You will need:
~ Blocks. Any size, any shape - whatever suits your fancy. Mine were just under 2" x 2"
~ One sheet of scrapbook paper, preferrably not a heavy cardstock.
~ Mod Podge
~ Acrylic paint... or any other paint you have lying around and want to use up.
~ Distress Ink - I used Walnut Stain
~ Sand paper and/or sanding block.
~ Paper towel that has been slightly moistened. I washed my hands, shook them off, and then dried them on a paper towel. Perfect amount of dampness.
First things first, cut your scrapbook paper down to size. I measured just one of my blocks and then cut all 11 pieces the same size. Turns out that not all the blocks were exactly the same size. No worries! The paint, stain and sanding covered those little imperfections right up.
Next, apply an even coat of mod podge to the side where you'll place your paper. I like to use a foam brush. Make sure that the mod podge covers all the way up to the corners and that it isn't so thick that it will bubble all up.
Why do I look like I'm missing a thumb?
Lift up, wipe the excess mod podge off your workspace and place the block on a clean surface paper side down. Let it dry overnight (or at least all day).
Now it's time for a light sanding. I used the coarser grit sandpaper to curve the edges a bit and the finer sanding bock to carefully distress the paper itself.
No thumb again!
After dusting off, use a foam brush to paint all four sides just enough to cover the wood.
Well what do you know, I do have a thumb!
Then take your brush and lightly rub it along the four edges to cover up any gaps the paper left and to unify the side with the front.
Quickly take your damp paper towel and wipe off the excess from the edge. If it smudges a bit, that's great. It creates more distressing.
Once the paint is dry, take that handy dandy Distress Ink Pad and with the corner lightly tap, brush across and smugde all over the blocks face. {first time using distress ink? try it on a scrap piece of the same paper to get the feel}} Use the tips of your finger and corner of the damp towel to get just the effect you want. Start with just a bit! You can always add more, but you can't get much off.
Left to Right: plain paper, after light sanding, after a bit of distress ink.
Try pressing lightly and then heavier with the distress ink. Make it look a bit uneven. Don't just glob it all on. The purpose is for it to look weathered, not painted.
It will be pretty dry with in a few minutes. Once you can handle it, take your fine sanding block and distress it a bit more. Not much! Just enough to rough up the ink.
Ta-da! Beautiful and inexpensive blocks.
If you try out these out and blog about it, be sure to send me a quick note so I can check out your post! Don't have a blog? Email me the photos and I will be happy to feature them here!
Yesterday I said that I would share the recipe for Caramel and Oreo Brownies in honer of my cute hubby. And so I diligently went to hubby's work and made the brownies there following Making the World Cuter's instructions. They were delicious! But I was such a goober that I forgot to take pictures! What was I thinking?
I followered her recipe exactly and they were great! The only things I would do differently next time:
~ To buy a stronger caramel. I chose a generic, bulk bin caramel and it wasn't strong enough for my tastel buds. {I am such a caramel lover}
~ Definatly serve with ice cream or whipped cream like she did. I didn't. But I think it would help to cool down the inner, molten goodness.
~ And count your cupcake liners before packing up all the ingredients and heading out to your hubby's work. I arrived with only 8 liners and needed 27. Oops!
So go on over and get her awesome recipe, look at her easy photo tutorial and make yourself a batch of these amazing delights!
Are you crafting, baking or having some other great adventure today? I'd love to hear your story!
All photos taken by yours truly and Mr, "to Blessed to Stress" {AKA: my hubby}
This post in linked to Remodelaholics and a Very Blessed Nest's parties. Head on over and join the fun!


The blocks seem prety easy to do! Yours really came out well. I can't wait for your giveaway!!!
ReplyDeleteThat is so cute. Is it bad that looking at them makes me slightly hungry?? ;) Thanks for commenting on my blog! It makes my day!
ReplyDeletegreat job and a super tutorial - thanks for always leaving such great comments i am following you!!
ReplyDeleteThose blocks are too cute. Very creative!
ReplyDeleteThanks for your comments on my blog and I'm now following you!
Kat :)
The blocks are so cute! I love the pattern you chose for them. Thanks for coming by and visiting! I would love to see what bed you and your husband decided to make!
ReplyDeleteyikes! Scratch the bed comment... I got distracted reading your tutorial on the blocks, that I forgot which person I was commenting. :-)
ReplyDeleteHave a great weekend!
Love the block idea.. will have to try them... looking forward to Monday Giveaway... you have such good ideas!
ReplyDeleteSandy
http://thewondersofdoing.blogspot.com/
These are especially cute! I need to figure out a good place for these so I can make them!
ReplyDeleteThanks so much for linking to that party, I hope to see you again next week!
those turned out super cute! thank so much for linking up!
ReplyDeletegee, I know these are blocks of WOOD, but my mouth is watering just as I am looking at them. What an apt name, Brownie Block!
ReplyDeletethanks for commenting on my bead balls, Emily. I love your suggestion!
These turned out adorable! Now I am hungry for some brownies!!
ReplyDeleteHave a great day!
Courtney @ RedHeadsCraftMoreFun
These are very cool...great instructions, too.
ReplyDeleteJane
Seriously love those blocks! Thanks for commenting on my blog - I will be back to yours!
ReplyDeletewhat an awesome idea - I have those wooden remnants sitting in my garage saving them for something. Thanks for the inspiration!
ReplyDeleteSo pretty! I love the damask pattern. Cute name, too!
ReplyDeleteLove this!
ReplyDeleteadorable!
ReplyDeleteVery cute! I love the paper you picked!
ReplyDeleteVery cute idea (o:
ReplyDelete