Saturday, February 27, 2010

In The Quiet Place


"A giving spirit is evidence of a grateful heart." 


Whose life could you touch today?
Although we may be exhausted, run down and feel like there is nothing left to give, there is always room to give.
A kind word.
A big hug.
A forgotten "I love you."
A prayer for someone in need.


Praise the Lord oh my soul,
And forget not all his benefits.

The Joy Of Saturday

Happy Saturday everyone!

I can't even begin to tell you how exciting it is to spend a whole day with my man - the sweetest, coolest, mostest lovingest hubby ever! And before we tackle the longest to-do list ever, I wanted to share with you a recent find from the Fancy Store {AKA: Goodwill Outlet}.

If you have never been to a Goodwill Outlet before, it's so worth the effort to go online and find one in your area. Next week I'll be sharing some of my top finds from that store, tips for how to shop there,  and some more info on just how wonderful it really is {everything is sold by the pound... THE POUND! oh happy day!}}


Last week I found this treasure. I think that it may have been one of those tabletop things that holds plastic cups and bowls or some kind of non spinning spice rack. Do you have one like this? Am I right on either accounts?
All I need are containers that fit the unusually small holes.
Can you guess what we'll be eating lots of in the coming days? heehee!

Anyhow, when I spotted this little gem in the bins I practically dove in for it. It had potential - as a pen/pencil holder on my office desk. And since we have decided to change the theme in the office, this seemed like a great place to start - metals, black and white. I'll expand on that as we go along decorating and painting. But for now, I took a spin around the house to see what other wonders I could find for my new space.


And found these in the living room. They were also from the Fancy Store. Won't they be lovely in my newly revamped space? I am so excited for our new office look. Hopefuly we'll be able to reveal it soon!

Getting my Spring on!

What spaces are you busily revamping, repainting, reorganizing or  re-staging?

All photos taken by yours truly.
This post is linked to parties at Tater Tots and Jello and Finess Your Nest. Go on over and link up... it's a party kind of day!

Friday, February 26, 2010

How To Make Brownie Blocks

Thanks to all you fantastic readers out there who had such great comments and emails on my Brownie Blocks post! You guys just bless my heart. {{Original posts here and here}}


With that said, I want to remind you that I am hosting a GIVEAWAY starting Monday, March 1! The givaway is to celebrate all the fun new features I'll be revealing for this blog. Want a sneak peak? There will be a new and improved way to navigate through all the recipes and crafts, the "Best of Blessed, and my official twitter debut!


The giveaway will be super easy to enter - I'll explain how on Monday. But if you want to get a head start, become a follower! That right there is worth one entry. Easy Peasy! And if you follow, I know that you'll be blessed by all the great times we have here. So scroll on down and click the "follow" button!


Also, after seeing such enthusiam over the Brownie Blocks {thanks gals, you make me blush!} I am pleased to announce that I will including a set of them in the GIVEAWAY! Tonight I'll be busily putting on the finishing touches on the blocks and the other goodies included in the prize. {{giddy with glee}}

OK, on to the tutorial!

See the little blue/green blocks in the right corner? Another project almost completed!

You will need:
~ Blocks. Any size, any shape - whatever suits your fancy. Mine were just under 2" x 2"
~ One sheet of scrapbook paper, preferrably not a heavy cardstock.
~ Mod Podge
~ Acrylic paint... or any other paint you have lying around and want to use up.
~ Distress Ink - I used Walnut Stain
~ Sand paper and/or sanding block.
~ Paper towel that has been slightly moistened. I washed my hands, shook them off, and then dried them on a paper towel. Perfect amount of dampness.


First things first, cut your scrapbook paper down to size. I measured just one of my blocks and then cut all 11 pieces the same size. Turns out that not all the blocks were exactly the same size. No worries! The paint, stain and sanding covered those little imperfections right up.


Next, apply an even coat of mod podge to the side where you'll place your paper. I like to use a foam brush. Make sure that the mod podge covers all the way up to the corners and that it isn't so thick that it will bubble all up.

Why do I look like I'm missing a thumb?

Here's a tip for pressing down paper on smaller items. Once you have placed the paper on the surface, gently smooth it out with your clean fingers, turn it over onto a clean surface and gently and evenly press down. I can't stress the evenly and gently part enough! This will help press out any bubbles and excess mod podge, and will also pick up sublte texture of the wood grain (if it is pronounced).


Lift up, wipe the excess mod podge off your workspace and place the block on a clean surface paper side down. Let it dry overnight (or at least all day).


Now it's time for a light sanding. I used the coarser grit sandpaper to curve the edges a bit and the finer sanding bock to carefully distress the paper itself.

No thumb again!

 After dusting off, use a foam brush to paint all four sides just enough to cover the wood. 

Well what do you know, I do have a thumb!

Then take your brush and lightly rub it along the four edges to cover up any gaps the paper left and to unify the side with the front.


Quickly take your damp paper towel and wipe off the excess from the edge. If it smudges a bit, that's great. It creates more distressing.


Once the paint is dry, take that handy dandy Distress Ink Pad and with the corner lightly tap, brush across and smugde all over the blocks face. {first time using distress ink? try it on a scrap piece of the same paper to get the feel}} Use the tips of your finger and corner of the damp towel to get just the effect you want. Start with just a bit! You can always add more, but you can't get much off.

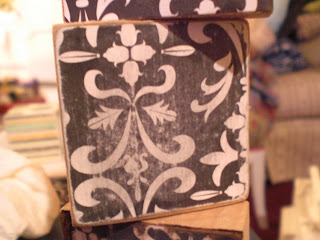
Left to Right: plain paper, after light sanding, after a bit of distress ink.

Try pressing lightly and then heavier with the distress ink. Make it look a bit uneven. Don't just glob it all on. The purpose is for it to look weathered, not painted.


It will be pretty dry with in a few minutes. Once you can handle it, take your fine sanding block and distress it a bit more. Not much! Just enough to rough up the ink.

Ta-da! Beautiful and inexpensive blocks.


If you try out these out and blog about it, be sure to send me a quick note so I can check out your post! Don't have a blog? Email me the photos and I will be happy to feature them here!


Yesterday I said that I would share the recipe for Caramel and Oreo Brownies in honer of my cute hubby. And so I diligently went to hubby's work and made the brownies there following Making the World Cuter's instructions. They were delicious! But I was such a goober that I forgot to take pictures! What was I thinking?

I followered her recipe exactly and they were great! The only things I would do differently next time:
~ To buy a stronger caramel. I chose a generic, bulk bin caramel and it wasn't strong enough for my tastel buds. {I am such a caramel lover}
~ Definatly serve with ice cream or whipped cream like she did. I didn't. But I think it would help to cool down the inner, molten goodness.
~ And count your cupcake liners before packing up all the ingredients and heading out to your hubby's work. I arrived with only 8 liners and needed 27. Oops!

So go on over and get her awesome recipe, look at her easy photo tutorial and make yourself a batch of these amazing delights!

Are you crafting, baking or having some other great adventure today? I'd love to hear your story!

All photos taken by yours truly and Mr, "to Blessed to Stress" {AKA: my hubby}
This post in linked to Remodelaholics and a Very Blessed Nest's parties. Head on over and join the fun!

Thursday, February 25, 2010

BROWNIE BLOCKS TAKE 2

So the comment box decided to go on strike for the Brownie Blocks post. I have no idea how that happened, but the comments are working for every post... except that one! Seriously? And there were such lovely comments in my email inbox too - so bummed!


Oh well. If you have a comment, question or just want to join me in my pitty party of lost comments feel free to comment below.

Brownie Blocks

EDITED TO ADD: Thanks to everyone who informed me that the comment box was turned off. What?!?! How did that happen? Anyhow, it is up and runing again on all other posts but this one. ugh! So if you would like to comment on the Brownie Blocks or have any questions, feel free to comment here. You know how much I love hearing from you!

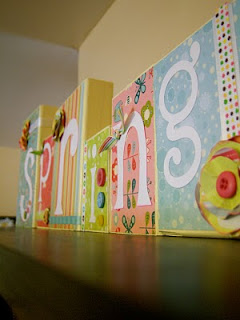
A few days ago, I saw these adorable blocks over at Inspiring Creations - a fantastic blog written by the talented Lindsey. She is a crafting genius! Seriously, I am so inspired by her home decor talent.


Anyhow, these "Spring" blocks gave me an idea to make some for my newly revamped laundry room. {by the way, Lindsey's tutorial on how to make these is awesome. It could be an E-book.}


While we were out and about on a scavenger hunt at the local boutique {aka. Goodwill}, Hubby agreed to cut the blocks out in differnt sizes all cute like Lindsey's.

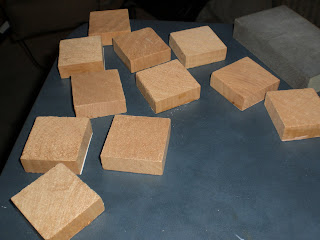
And then I walked into Value Village. And I saw this.

There was a choir singing,"ahhhhh" all angel-like in the background. There were visions of a gazillion crafts dancing around in my head. I may or may not have giggled out loud and done a happy dance right there in the store.


Once home, I dumped out the contents and realized that I had hit the jackpot. not only were there a bunch of fineal, spindle, and round thing-a-makiggies.... there were blocks! Lots of them. Enough to spell out "Laundry Time."


Well, one thing led to another, and the Laundry blocks became too fancy for the laundry room and have now ended up in my living room entryway. And I love them. With all my little heart. Don't fret laundry room. Your blocks will come.


Actually, I would put these in the laundry room... I just really wanted them in the entryway with the bird egg vignette. There I said it.


Tomorrow I'll post the tutorial for my blocks. Today, I am too busy swooning over my newly crafted tablescape with Brownie Blocks.

Yep. Brownie Blocks.

Keep reading, you'll see what I mean.

The blocks project had just been completed,
and I called hubby over for a look....

Hubby: "I like them! They came out awesome babe." {sweet smile}
Me: "awww, thanks!"
Hubby: {eyes light up} whoa! look at them from over here! {motions for me to come over}
Me: {Head over and look} "Oh yea... they do look great from here too." {and they are great... but they also look the same}
Hubby: {huge grin on his face} "they look like brownies! and the bird-egg-thingies in there look like chocolate malt balls!"
Me: {laughing hysterically at this point}
Hubby: "If you set those on the table, I bet my Grandpa would totally try and eat those!"


He is, of course, refering to a time when Grandpa N. thought that some sparkly mini eggs on the dinning room table were jelly beans and proceeded to munch on a few. Unfortunatly, he was very disappointed they were plastic, spit them out, Grandma N. laughed a bunch and then left us money to replace them. So sweet! I love that story!}

I need something for the top of the Large Candlestick...  Any ideas?

And so, in honor of my hubby's sweet comments about my new blocks, I am dubbing these the "Brownie Blocks" and tomorrow I shall post about the wonderful Caramel and Oreo Brownies I made to take to his office. Hello yummy goodness! {idea from Making the World Cuter - love that blog!} Be sure to come on back tomorrow for the recipe, tutorial for these blocks, and more down home goodness.


What homemaking adventure are you embarking on today?

All photos taken by yours truly and Mr. "too Blessed to Stress {AKA my hubby}
This Brownie Block post is linked to Tablescape Thursday at BNOTP and Get your Craft on Thursday with Life as Lori. Head on over to see all the other gorgeous tablescapesand crafts!

Tuesday, February 23, 2010

Balancing Act

There are days when I feel on task, ahead of schedule, organized, and on top of the world. Don't you just love those days?


You know the ones I'm talking about:

~ Your day starts off with the perfect cup of coffee, a sunny sky and an empty dishwasher.
~ You fit into your skinny pair of jeans
~ Your home is so clean and tidy that the only task left to do is re-fluff the pillows.
~ Your bills, receipts, coupons and random paperwork are all filed in their proper containers.
~ You prepare a lovely three course meal that is happily received by even the most picky of eaters.
~ You look back at the end of the day and realize that you accomplished everything listed in your cute day planner and still had time to match 89 pairs of socks.


Most days, I feel petty good about my time management, productivity and quality of hours spent. And then there are the days that knock the wind out of me...

~ I'm up earlier than usual, but somehow I'm late to everything.
~ I've laid everything out the night before, but today eveything I touch mysteriousely disappears just when I need it.
~ The laundry pile threatens to swallow me whole, even after multiple loads.
~ Time runs out, and I resort to ordering take out - 10 minutes before dinner time.
~ All available counter space and every free seat in the house is piled so high with random things that if I sneeze it may avalanche on me.
~ At the end of the day, I am so overwhelmed that everything is bigger than it seems.


yep... we all have those days now and then.

And that's exactly why I started this journey here at "too Blessed to Stress."

You see, "too Blessed to Stress" does not mean that stress will never come. Far from it! Change, challanges and frustrating moments lurk around every corner and it's effect on us as women, wives, daughters, mothers, grandmothers, business women and homemakers can be devasting.

Devastating - but only when we allow it.

"too Blessed to Stress" means that in midst of the chaos, trials, sadness, piles, dirt and grime we chose to focus on the blessings of the moment. Finding the proverbial "silver lining on a cloud" so to speak - instead of finding a cloud for every silver lining!

And it is times like these that I know I need balance. To know that it's OK to take risks and to fail now and then. That it's ok to cry for a moment, because joy comes in the morning! That frunstration is a valid feeling, but I must not act adversely upon it. That I have been given grace, and in turn I must shower it upon others. That family must come before "the other things" that have been temporarily deemed more important.


For several years, I have had this quote on my entryway wall. A fantastic reminder that in all things, balance is needed:

"We need a balance between work and play, between kindness and firmness, between waiting and praying, between saving and spending, between wanting too much and expecting too little, between warm acceptance and keen discernment, between grace and truth. The longer I live, the more I must fight the tendency to go to the extremes... and the more I value balance."  ~C.S.

Are you playing a balancing act today? What do you do/use to keep yourself grounded?

All photos taken by yours truly. Cherry Trees near our home, Laundry room chaos (GRAND REVEAL COMING SOON, boxes for Goodwill items, and our pup enjoying the footstool I remade in THIS POST.

This post is being unwrapped over at Chatting at the Sky. Head on over and share your gift for today.

Monday, February 22, 2010

How Sweet It Is

Just because Valentines is over it doesn't mean that we have to put away all those super cute jars and dishes full of candy and goodies. In fact, at the "too Blessed to Stress" home, there is always some kind of yummy goodness in a cute jar somewhere in the living room or kitchen.


I think it all goes back to my lovely Grandma. She always had a cuter than life candy dish full of lemon drops and seasonal candy. Of course she passed that on to my amazing Mother and now on to me. I'm trying to pass that value on to my child as well, but alas, four-legged-canine kids just eat all the candy and don't share with others. I'll have to wait till I have a real kiddo.


Since my only real usable counter space in the kitchen is a huge slab, I try to keep some kind of tall-ish decoration in the center. Two reasons why: 1) It keeps me from filling up the whole counter with random stuff that never has a home. 2) I think it makes my kitchen look pretty, warm and inviting.


Most of the time, I have a large pedestal with a yummy candle in the center of the counter. But the other day I was putting away the baking candy in their glass jars ( I buy the candy in bulk) and thought it would look real cute on my counter sitting on a cake pedestal.


To make it a little fancier, I made these simple tags in coordinating colors. When I'm done with the candy in the jars or just get tired of the tags, I can remove them and attach to something else. Repurpose, reuse. I like it!

I used a tag punch, ribbon, and some other flower and heart punches to make these tags, but you culd hand cut, print off the computer, or have your kids make the tags. The possibilities are endles!


There is a jar for every member in our little family of three: dark chocolate rounds for me, white chocolate chips for my hubby, and mini marshmellows for the dog. Yep the dog. Hubby has a marshmellow gun he got for Christmas. He loads that thing up and shoots it in the air (not at the dog, mind you) and she merrily runns aroung the house gobbling up the marshmellows.  Gotta keep the whole family happy!


Delicious touches that make my kitchen feel special. And best of all, this was super simple to assemble. Little to no time involved, used things I already had in my home, and instant gratification.

What simple ways are you dressing up your home this week? Have you posted about it? Please let me know in the comments below so I can check it out!

All photos taken by yours truly. Also, I think it's obvious that these were not taken on the kitchen counter but on a small table. There's just better light in the livingroom, in case you were wondering :)

This yummy post is linked to parties at the following blogs: Making The World Cuter, and The Girl Creative. Are you linked up to these fun parties?

Friday, February 19, 2010

Being Bold

This is a repost from last year. Since I am spending the day with my fantastic mother, I thought it would be appropriate to repost this funny escapade of ours.

Question for ya: If you see a beautiful arrangement or decor idea, are you bold enough to take a photo so you'll remember? Or does the embarrassment of taking photos in awkward places keep you from documenting your ideas and inspiration?


My mother is an amazing woman. And when it comes to photos, She is fearless! See the beautiful photo above? That lovely arrangement of floating petals was in the bathroom of a cruise ship we were on.


Yes you heard right. The Bathroom.

Talk about taking photos is awkward places! Well the story goes like this:
 We were standing around waiting for lunch to start and I decided to run to the restroom real quick before we were escorted down the hall. A few seconds later, I heard someone walk in and wash their hands. Then I hear the sound of a camera shutter opening. And then click...flash.


I knew instantly that it was my mom!


"Mom?" I said.

She burst out laughing, "I thought I was alone in here!"

"You just took a photo of that petal bowl, didn't you?"

"How did you know?!?!"

Now I'm laughing so hard, the tears are rolling.


Yes indeed, that lovely photo would have never been unless she was brave enough snap a pic in an awkward place.


(note: she REALLY did think she was alone in there. Neither of us would ever take a photo in such a taboo place unless alone. just sayin'.)

Hubby pretending to be excited for his nibblet-of-a-salad!

Just for fun, here's a couple shots of my honey and dad pretending to be excited about their dainty salads at the lunch that day. My mom and I thought they were kinda cute. They saw it as a two bite nibblet. My hubby's exact words, "This is the salad? This is ridiculous!" We laughed a lot that day!

My awesome Dad -What better way to eat a fancy salad-roll than with your hands?

So here's to being bold, fearless and making memories. What memories are you reminiscing about today? I'd love to hear in the comments below!
 
All Photos taken by yours truly. Except for the petals in the bowl... we all know who took that one:)