Also just thought I would give you a heads up... A GIVEAWAY STARTS TOMORROW right here at "too Blessed to Stress." So get ready for a great gift and lots of fun ways to enter!
Just thought I would give you a quick glance at what we have been up to at the "too Blessed to Stress" nest.
Hubby built me an awesome crate style coffee table. It is the best! All it needs is a little distress ink, an emblem, and a bit of roughing up with sandpaper and it will be ready to go. I can't wait to show it to you!!!
There has been plenty of Fall Fluffing {and by fluffing I do mean decorating, in case you were wondering. ahem.} going on. So get ready for Easy Summer to Fall Decor Tips starting tomorrow.
September seems to be party month around here - including my own! I have already received some fantastic gifts and much love this week... and it's still three days till the actual day! Oh the joy!!! By the way, thank you all for your lovely birthday emails and Facebook messages. Along with my upcoming birthday, there were several other parties which I had the privilege to help decorate at. Looking forward to sharing a simple tutorial for felt banners and cupcake toppers.
And lastly I though I would share a simple tutorial for these lovely flower pins:
I just LOVE the ruffled look.
This was inspired from a photo in a magazine my mom was reading on the way to vacation earlier this year. She saw it, knew I would want to try and make one, so she ripped out the page and tucked it away to bring home to me. My mom is awesome!
Ok ready to learn how to make a Flower Poof? {yes that is what I call them, original I know.}
You'll need the following:
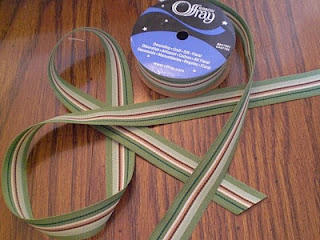
~ 1" striped grosgrain ribbon. Make sure it is printed on both sides.
~ sewing machine or a needle and thread in a coordinating color
~ small piece of coordinating felt { about 5"x2"}
~ brooch pin
~ hot glue gun
~ lighter
Cut around 30" of ribbon, trim the ends diagonally, and seal the ends by lightly touching the ends to the flame of your lighter.
Then decide which stripes you want to face outwards on your flower. I chose to have the lighter greens and browns showing and to place the end with the dark green stripe on the inside of the flower.
Using a wide stitch, sew about 1/8" from the edge of the ribbon. Do not finish the ends by sewing backwards, you'll need those to gather the ribbon with.
Once you've sewn all the way down the ribbon, take the back thread and hold it in one hand.
With the other, gently push the ribbon down creating a ruffly gather.
Once it is all gathered to the tightness you desire, trim the excess thread and seal with a dab of hot glue.
Trim your felt into two circles at least 1 1/2" in diameter.
Take one end of the ribbon and glue it down in the center of a felt circle.
Then twist and turn the ribbon abound the center, fanning out as you go. Make sure the side that is gathered is always facing down, toward the center of the flower. As you shape the flower, glue the sewn edge to the felt.
Take your second piece of felt, fold in two, and snip two small cuts about 1/4"apart.
That will be the opening for the brooch pin.
Slip the pin through, close and secure on either side with a dab of hot glue. Turn your flower over and cover the felt circle with hot glue.
Place the second circle over the glue, making sure to secure tightly.
Seal any seams that seem have not closed the first time around.
Enjoy! Mix and match, wear on shirts, coats, hats, purses, etc.
Well, I do believe that is all for now... be sure to stop by tomorrow and enter the GIVEAWAY!
What have you been crafting over that last few weeks?
I'd love to see!
All photos taken by yours truly.


Super-cute! I will definitely have to try these :)
ReplyDeleteWhat an adorable pin, those are great! Glad that all is well and you've been beautifying for fall, can't wait to see what you've done.
ReplyDelete