Monday, November 29, 2010

Doing The Unexpected

Can you believe that Christmas is only 26 days away? It feels like just yesterday the leaves started to turn colors and now they are almost all on the ground! Thanksgiving weekend just flew by in a hustle and bustle of family, friends, turkey and pumpkin pie bliss and lots of memory making.

Our lovely tree from last year.

And once the last turkey meal had been eaten, the urge to decorate the tree hit full force. I was so ready... and lucky for me so was hubby... which is great seeing as I could never get the boxes out of the attic without him.

Carolers from my Grandma. Love these!

So we set aside Saturday for just the two of us and it was wonderful! We spent the day running a few errands, listening to Christmas carols and making up our own carols as we drove around town taking in the Christmas sights. After all that inspiration, we headed home and got to work putting up the tree..... and that's when it happened. Someone - that lives in this home, and is not me or the pup {ahem, hubby.}- decided that it would be a good idea to put the tree in the middle of the great room. The middle. To some that may not be a big deal, but we have a big 9 foot tree. Think about it... 9 feet worth of tree in the middle of your living room...

The middle.

Hubby reaching the top of our beautiful tree last year.
Notice the tree is dutifully in the corner...where most normal people would place it.

You see last month in a housewife-crazed-last-minute-decorating-at-10:00pm-inspiration-moments {what? don't you have those too?}I decided to move the living room furniture into the small family room at the front of the house. We had been debating whether or not we wanted couches or reading chairs for our new space, and I thought why wait? Let's just move the existing living room furniture in there, live with it and see how we like it. Well, we LOVED it. So much, in fact, that the furniture stayed in there and our living room only has two recliners and two outdoor chairs... and a great big hole where the couches used to be.

2009

Turns out hubby has always wanted to have a tree in the middle of the room, just for kicks. And since we are just that awesomely cool {or strange, depends how you look at it} we put our tree in the middle of the room.
And you know what?
It's strange,
unexpected,
and after much debating,
questioning,
and being unsure if I could handle this....
....secretly...
 I love it!

There, I said it. My secret is out. I actually love the tree in the middle of the room! You can see it from the living room, dining room, kitchen, family room and entryway. Oh and hubby pointed out last night that you can also see it from the hallway. We may just have to eat dinner tonight in the hallway to enjoy the tree from another angle.
At a year round Christmas store.

Every time I walk in the room I crack up at the sight of the tree in the middle of the room. Others may not get it. They may not like it. But here's the deal: we like it.  We made a memory. We did something unexpected and it produced an afternoon full of entertainment. And while the tree may not be placed here every year, for this year it is perfect.

So here's to doing the unexpected, throwing caution to the wind, breaking the rules and trying something new. What are you waiting for? Make a new tradition! Try something unepected! You may just find that you love it... and you might make a lasting memory or two in the process.

Want to take a peek at our afternoon of putting up the tree? Check out our first video-post below!


Merry Christmas everyone!

All photos taken by yours truly and my hubby.

Thursday, November 25, 2010

Gobble Gobble

Our little pup ready for turkey.

Happy Thanksgiving to each and every one of you! I hope your day is filled with the love and warmth of family and friends, lots of memory making and of course a delicious dinner.

Turkey cookies I made for Bible study group.

As we enjoy the long weekend, let us not forget to give thanks to the One from whom all blessings flow.

"Enter into his gates with thanksgiving, and into his courts with praise; be thankful unto him, and bless his name. For the Lord is good..." Psalm 100:4, 5a


HAPPY TURKEY DAY!

Wednesday, November 10, 2010

Favorite Things and Paper Pumpkin Mini Tutorial


I said it once {or twice... or more} fall is one of my favorite times of year. The colors, scents, tastes  *sigh* just thinking about it makes me happy!


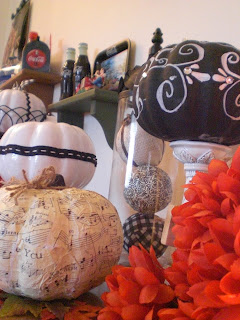
So as you can imagine it is one of my favorite seasons to decorate for as well. This year I thought that I would try out some neutral fall decor in the coca-cola room. Seeing as it is decorated in red, black, and white I needed something to stand out while not competing with the riot of colors in there.


Perfect chance to try out the black, white, and brown pumpkins I've been itching to make.


Small random interruption: OK, I just want to say something really quick. If you have not had time to decorate for thanksgiving/fall do not dismay. There is still time! If your little heart longs to see at least a bit of fall decor in your home go for it! It's never to late to make at least an entryway display, a simple centerpiece, or maybe a little touch on top of your mantle or bookcase. Keep it simple, no need to fret - autumn can still make an appearance in your home! Actually, these pumpkins are so ridiculously simple and inexpensive to make that these could be your touch of fall this year. Ok, I'm done. Getting of my soapbox :)


So as I was saying, I really wanted to try out a white pumpkin this year but the faux {and real ones} were just to pricey for me. I had an unspoken budget.... $1.00. Ok not really, but that is all I really wanted to pay for a single pumpkin. And lucky me, I found this one at the Dollar Tree.


After a 3 quick coats of plain old 99 cent glossy spray paint it was ready to decorate.


{By the way, always prop or hang the item you are spray painting. It will help you reach every corner and crevice on each coat. Here I am using a candle holder with a big stake in the center, covered with tissue paper. So easy!}


So all that was left was to decorate my happy white pumpkin. A bit of left over ribbon {which was from the dollar bin last year} covered the "seam" on the pumpkin and a little bow for cuteness. I was a tad bit worried that the glue gun would melt this foam-like pumpkin, but it worked great - score 1 more point for the glue gun!


How simple and CUTE is that?!?!


I loved it so much that I went back and got 3 more. So I guess this project cost me $4.00. A price I am willing to pay for a whole table top of decor!


Pumpkin #2 got a coat of white as well, black ric-rak every 5 inches or so, and two little leaves made out of a scrap of black and white gingham fabric.


Both ribbon and fabric were attached with my trusty glue gun, of course.


Pumpkin #3 was coated in flat black cheap-o spray paint. Then I took a white Chalk Ink marker and free handed the squiggles all around and up the stem. A few rhinestones here and there applied with... you guessed it... the glue gun.. and done!!! Are you seeing a pattern here? Easy, Inexpensive, Satisfying. Oh yea, and glue gun.


The last pumpkin took a bit more time {like 10 minutes more, that's it!} I scanned and color copied some old sheet music that belonged to my darling grandmother. It already had some yellowing to it which copied as a great creamy brown. No photoshop adjustments or any fancy tricks. I just put it in the scanner, pressed color copy and printed it out onto regular old printer paper. How simple is that?


Then I tore it into random strips and chunks{no smaller than 2"x 2"} and mod podged them onto the pumpkin. As I placed each piece, I crumpled it up even more to give it some texture. I also made sure to press the paper really well into each vertical crevice on the pumpkin so that it would retain it's natural pumpkin shape.


After letting it dry, the stem got a coat of black acrylic paint - applied with my finger. I was to lazy to find a brush for only that. The finishing touch was some jute all twisted up in a bow and .... drum roll please... glue gunned on! Bet you didn't see that coming. Yes, my glue gun and I are inseparable.


There you have it! Four of the easiest pumpkins I have ever made... and they make my little heart happy every time I see them.


Have you decorated for fall? If not, are you planning on a few touches for thanksgiving?

All photos taken by yours truly and Mr. "too Blessed to Stress" aka, the hubby.

Tuesday, November 9, 2010

A Meal Fit For A Porker


Hello lovelies! wowie it feels so good to be back blogging!!! October was a whirlwind of work. It is truly the busiest month of the year for us. I was gone almost every weekend and it was a mad dash just to get dinner on the table some nights. Thankfully, it was all fun work and very rewarding... but whew! Am I tired!


Even with all the running around and moments of craziness hubby and I did reserve a few nights to hang out. On one of those evenings I decided to host a Pig Dinner For Two.

You see I had this idea for some piggie cupcakes and a themed dinner that I had been wanting to try out for a while... and since there were no kids visiting us in the near future, I decided that the two of us could use a night of laughs and acting like kiddos. So I just want ahead and made a whole pig themed dinner for hubby and me.... and our pup who eats like a pig. oink.

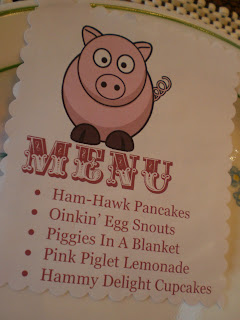
Just for fun I wrote out a dinner menu.


I made sure to include plenty piggie references all over the table.


There were even pigglets on the napkins!


This is so simple: Just print out an image to the desired size, cut out with decorative scissors, punch a hole in the top and use small ribbon to tie on to napkin. ta-da!

There was even a little porker waiting to surprise you when you took a drink of your lemonade.

I only have eyes for you!

These piggie pancakes were so simple to make. All you need is your favorite pancake batter recipe, some red food dye and a squeeze bottle. I used the candy melt squeeze bottles, but you could even use something like a clean left over ketchup bottle.


 Just pour some batter in to the bottle, add a few drops of dye and shake/squish it around till you have a dark pink dye. Then squirt out the head, snout, eyes and ears and let them cook for a bit. Fill in with plain batter. When it gets all bubbly, turn over to finish cooking and you'll have a perfect piggie face. How cute is that!


The stars of the evening were these little piggie cupcakes.


These really are so easy to make. They were fudge chocolate with chocolate chips and cream cheese frosting... oh my yummy goodness!

I'll have a tutorial for these and the pancakes later this week... and it will be in video form!!! That's right... video posts will soon be coming to "too Blessed to Stress" and I can't wait to share them with you!

I hope you enjoyed the Piggie Dinner, and that you'll be inspired to try out your own themed meal sometime. If you do, send me photos or a link to your post, because I would love to see!


What animal {or animals} would you chose for a themed dinner?

Partying with Tidy Mom at her linky party. Check it out!
All photos taken by yours truly and Mr."too Blessed to Stress, my hubby!