Showing posts with label from the kitchen. Show all posts

Wednesday, January 26, 2011

Valentine Treat - Death By Chocolate

While hubby gets the new computer {yippie!} all set up and I figure out where all my photos are stored, I thought that I would repost this delicious recipe that I shared last year.
Chocolate lovers - enjoy!

A good friend asked me this last weekend if I crave sweet or salty when I want a snack. And the truth is that I usually prefer something salty, like salt and vinegar chips. {to die for} But if I have something sweet, I want it to be super sweet and very rich. I love dark chocolate and creamy toffee. So you can imagine my absolute delight when I got to a scrapbooking weekend and was informed that my good friend had made Death by Chocolate for our dessert that night.


Have you ever had this rediculousely simple yet delicious dessert? It is amazing! And it looks just stunning in a triffle dish set in the center of a table.


The master mind behind the creation in this photo is our good friend "G" - the fantastic cook. Really he should be called the mostest-amazingest-talented-never-makes-the-same-recipe-twice-and-they-all taste-great-cook. Try putting that on a business card :)

He graciousely shared the simple recipe for this delectable wonder and I in turn am sharing it with you. And to show you just how easy it is to make, I am making one just to take photos.

Oh, the sacrifices I make for this blog.


You will need four main ingredients:
~ 1 chocolate cake, 13x9 pan (I just used a mix for convenience. Feel free to use your favorite cake recipe.) 
~ 6 Skor bars
~ 1 box of chocolate pudding (hubby chose Chocolate Fudge. His theory: if you're gonna go all out on dessert, go out with a bang!)
~ 1 tub Cool Whip, or fresh whipped cream


While the cake bakes, mix up the pudding and crumble up the Skor bars. Once cool, crumble up the cake. If you don't have a triffle dish {like me), use a clear, deep bowl. Or tall cups for individual servings.


Now the fun part - layering. First comes a layer of cake crumbles. Then pudding, coolwhip and Skor crumbles. See that blob of pudding? Avoid splatters like that so that the layers will be visible and not all mushed together. If it happens, just wipe it off with a paper towel.

Snack on all ingredients while assembling.
That part is essential to the success of the dessert. 

Repeat for at least two total layers. Top with cake crumbles. And Skor crumbles. If there are any left after snacking.

Easy Peasy.

This is such a simple dessert to make that it just may be my new "to go" dish for last minute meetings, potlucks, parties and to satisfy hubby's late night sweet tooth. Thanks so much "G" for sharing!


What is your "to go" dish for dessert? How about a dinner dish? Share in the comments below! Have you posted a great recipe lately? Let me know in the comments so I can check it out.

All photos taken by yours truly.
This delicious post is linked to We are That Family WFMW. Link up and join the party!

Tuesday, November 9, 2010

A Meal Fit For A Porker


Hello lovelies! wowie it feels so good to be back blogging!!! October was a whirlwind of work. It is truly the busiest month of the year for us. I was gone almost every weekend and it was a mad dash just to get dinner on the table some nights. Thankfully, it was all fun work and very rewarding... but whew! Am I tired!


Even with all the running around and moments of craziness hubby and I did reserve a few nights to hang out. On one of those evenings I decided to host a Pig Dinner For Two.

You see I had this idea for some piggie cupcakes and a themed dinner that I had been wanting to try out for a while... and since there were no kids visiting us in the near future, I decided that the two of us could use a night of laughs and acting like kiddos. So I just want ahead and made a whole pig themed dinner for hubby and me.... and our pup who eats like a pig. oink.

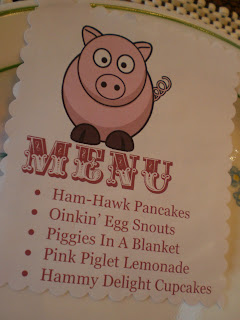
Just for fun I wrote out a dinner menu.


I made sure to include plenty piggie references all over the table.


There were even pigglets on the napkins!


This is so simple: Just print out an image to the desired size, cut out with decorative scissors, punch a hole in the top and use small ribbon to tie on to napkin. ta-da!

There was even a little porker waiting to surprise you when you took a drink of your lemonade.

I only have eyes for you!

These piggie pancakes were so simple to make. All you need is your favorite pancake batter recipe, some red food dye and a squeeze bottle. I used the candy melt squeeze bottles, but you could even use something like a clean left over ketchup bottle.


 Just pour some batter in to the bottle, add a few drops of dye and shake/squish it around till you have a dark pink dye. Then squirt out the head, snout, eyes and ears and let them cook for a bit. Fill in with plain batter. When it gets all bubbly, turn over to finish cooking and you'll have a perfect piggie face. How cute is that!


The stars of the evening were these little piggie cupcakes.


These really are so easy to make. They were fudge chocolate with chocolate chips and cream cheese frosting... oh my yummy goodness!

I'll have a tutorial for these and the pancakes later this week... and it will be in video form!!! That's right... video posts will soon be coming to "too Blessed to Stress" and I can't wait to share them with you!

I hope you enjoyed the Piggie Dinner, and that you'll be inspired to try out your own themed meal sometime. If you do, send me photos or a link to your post, because I would love to see!


What animal {or animals} would you chose for a themed dinner?

Partying with Tidy Mom at her linky party. Check it out!
All photos taken by yours truly and Mr."too Blessed to Stress, my hubby!

Friday, May 14, 2010

Come on in ... we've got pie!


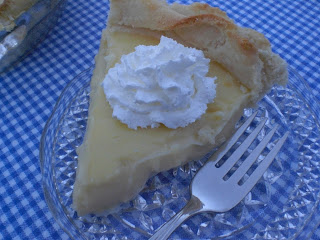
My oh my the lemon pie from last night was delicious!


I have been longing for lemon bars, lemon meringue pie, lemon cookies lemon-something for the longest time now! But the urge always hits at the most inconvenient time... like ten minutes before dinner was to be served or the middle of the night. {and no, I am not pregnant... I just really love lemon anything.}

The little dots are lemon zest... not lumps of flour... just saying :)


So I got my act together yesterday and decided to make my mom's yummy lemon meringue pie. Only problem - it required a microwave and we currently do not have one. {I know, crazy huh?} So I googled lemon pie and decided that what I really wanted was something that tasted like creamy lemon curd, like the kind you eat with scones.


 And that's when I found this recipe at Allrecipes: Sour Cream Lemon Pie.


 I followed the instructions {even though I have a tendency to expirement, I didn't this time}, used my grandmother's no-fail pie crust recipe {unless you really mess it up... then it fails. Read on...}, and it was wonderful. Go on over to Allrecipes and print it out.... you know you want to.... I'll wait.


{Humming Jeopardy Song}

Ok, moving onto the disasters that I hinted at yesterday here.

Because as wonderful as the evening was, there were a few mishaps along the way. It was a great lesson in not-freaking-out-twenty-minutes-before-hubby-gets-home.


First off, I tripled the salt in my grandmother's simple yet heavenly pie dough recipe. You heard right... TRIPLED! Instead of 1/2 teaspoon, I put in 1 1/2 teaspoons of salt. In other recipes,that would not make a huge difference. But in a pie dough.... wowie! It was salty. And I realized it as I rolled it out. So there were two options:


~ freak out, make another dough and not get the rest of dinner in the oven, and end up eating hours late. Or...
~ hope that some of the salt would be masked by the sweet lemon curd; and if not, I would just announce my mistake and scoop the curd out.


I chose the second option. I actually forgot about the salt incident... and it was not that bad... till the fourth bite. Then it got real salty, and we ended up eating the lemon alone. It was still delicious!


The second misstep of the evening came after baking the crust. It looked lovely with the fancy twisty border I gave it {thank you 1950's Betty Crocker cookbook!} But I had completely underestimated the time it would take for a crust to cool. It took forever! And by the time the lemon curd was almost ready to pour in, the crust was still steaming. What to do?!?!


Balance it on a pie rack, on two mugs over a tray of ice cubes! Easy Peasy! And it sure did the trick :)


And finally my last mishap of the evening, by far the worst.... I lost half an eyebrow. No exaggeration. And not the end half... the MIDDLE half! It looks like two tiny eyebrows on one side - oh the horror! Although I would love to blame this Brow Blunder on a candle flame, it was all my fault.


You see I can't pluck or wax my brows to shape them like most gals. My skin is way too sensitive. It swells, bleeds and makes me look all goobery for days. So I have to shape them with a tiny electric razor made for brows. Do you see where I'm going with this? As I'm holding the razor, all finished, something caught my eye, spooked me, I lost my grip on the razor and on the way down it took half a brow with it! And no, I will not post photos... after all, Google is forever!


But after a slight panic, some eyeliner and smudger, all was back to {somewhat} normal and I was back in the kitchen busily putting the finishing touches on our dinner.


Either hubby has still not noticed...or he feels bad and doesn't want to say anything... I think he hasn't noticed... cause if he had, he would be rolling on the floor laughing!


What mishaps have you survived
moments before serving a fancy dinner?

All photos taken by yours truly.

Thursday, February 4, 2010

Making It Special

What a fun week this has been! I have so enjoyed talking with all you wonderful gals about gift baskets and making them meaningful. And getting to know you all a little better through email and comments has just made this week of being cooped up in the house due to a nasty cold all the more bearable. Thank you! I am so looking forward to getting to know you all even better throughout the year.


Yesterday I mentioned that I would share some simple ways to spruce up a gift of food. Since we've already covered how to put baskets together and fun ideas for fillers, today I want to show you some special touches for food packaging before it goes into the basket.

This is a little piknic style meal I put together for my hubby and me. But these ideas could be used when delivering a meal to a new mother, a family who has just moved in, a date with your kiddos, meal for a teacher, or for no special reason at all - a "Just Because" occasion. 


In this case, I got all my containers, ribbons, and tags together to make sure they matched - blues, silver and gold. {not that hubbster would notice... but he might! He's surprised me before.} I decided that I would pack his lunch as usual, but this time include a few messages that indicated that he should bring his lunch and meet me at the park.


So instead of just writing out a note, I used my handy dandy Chalk Ink Marker to write on the plastic container. Have you discovered these yet? They are fantastic! They make your chalk board art look so clean and crisp and work well on things like tupperware.


Then I tore off the label to a can of pineapple {yep, he eats it all right out of the can} and replaced it with a note to meet me at our favorite park.


I just freehanded a wavy line out of two colors of scrapbook paper, wrote my message, and taped them together in the back where the original label had a seam. {Make sure to have a can opener handy if your can of fruit does not have a flip top lid!}


Next I packaged up some homemade Snickerdoodles stacked on top of a little silver tray in a plain plastic baggie. The tray keeps the cookies from rolling around in the lunch pail, and that way they will be in one piece when it's time for lunch. It was then finished off with a matching ribbon, and a little label I punched out and glued a heart on.


If you don't have a little tray, try a stiff piece of cardboard wrapped in aluminum foil. {I was going to show you, but wouldn't you know we're out of foil? Even in the backup cupboard! oh the insanity of it all! :) }


Last, but certainly not least, the veggie tray. Instead of tossing veggies all together in a Ziplock baggie, I decided that we needed something a little more special for our date in the park. How about a mufin tin! Loop some ribbons through the holes on either end of the tin, and then fill with veggies. I used grape tomatos, cauliflower, baby carrots, and crinkle cut cucumbers.


If you ever see a crinkle cutter on sale or in a thrift store - get it! It's one of those items that is not an absolute necessity, but it is a ton of fun, takes no more time than cutting veggies with a knife, and really makes a veggie presentation look fancy. After all, we are fancy people, don't 'cha know.


The veggies I will take with me to the park and place in the individual cups once there. The rest goes in my hubby's lunch tote. With a few minutes of my time, our luch date later this week will be a fun memory. One full of love notes written on food containers. I mean really, if that doesn't spell "LOVE" for a man, I don't know what does!

Note: Since the actual date isn't till next week when we're over our nasty colds, I ate most the muffin tin of veggies. With dip. While I wrote this post. Just tring to be honest.


Now it's time to think of ways to change it up for someone else! How about making up silly rhymes to place on the canned food that describes what's inside? Use the Chalk Ink to wrtie "Welcome Home," "Feel Better," "You're Special" anything for the occasion. Make a whole bunch of cookie sacks, walk around the block with the kiddos and give them away to the neighbors.

What are other ideas to "gussy up" a meal delivery that you could share in the comments below? I'd love to hear them!

Giveaway Items!

Don't foget that my first ever givaway is still going on till Saturday. {{excited smile}} If you have not had a chance to enter, click here for the full post.

Be sure to come back tomorrow as we wrap up a week gift giving with ideas from you - my fantastic readers and followers! There will be links to other awesome posts, and I'll be sharing some of your great comments.

Have you posted recently about gift giving? If so, I would love to read your post! Maybe even feature it tomorrow along with the others. Send me a message before 12PM tonight (PST, pacific time, or however you're supposed to write that) and I'll be happy to take a look!

See you all tomorrow - have a marvelous day!

All photos taken by your truly.
This post is linked up to a fantastic new Linky Party - 100 Ideas Under $100 at the Beyond the Picket Fence. Make sure to head on over and participate!

Wednesday, May 20, 2009

Simple Yet Delicious

This last Monday, the women's Bible study group I attend had their summer farewell meeting. It was a great time of sharing, laughing and yummy finger foods. Each group was assigned a kind of food to bring (taco toppings, snacks, bagged lunch) and share with the class. Our class was assigned finger foods. So I sat up Sunday night fretting over what to take.

Normally, I wouldn't worry so much, except my kitchen is in disrepair while we do some painting/rearranging in the rest of the house. So I decided to make tortilla pinwheels. Super easy. Super yummy. Added some crinkle cut cucumbers and homemade dip for a little variety. Placed all on thrifted glass plates and added cute scalloped serving spoon.

Voila! A simple yet delicious finger food served on beautiful dishes. Perfect fallback for those times when you're in a pinch.

What's your fallback for a buffet/potluck? Salad? Dessert? Casserole?

I'd love to hear your thoughts and ideas!

I'm adding the post to WFMW over at We are That Family. head on over and check it out!